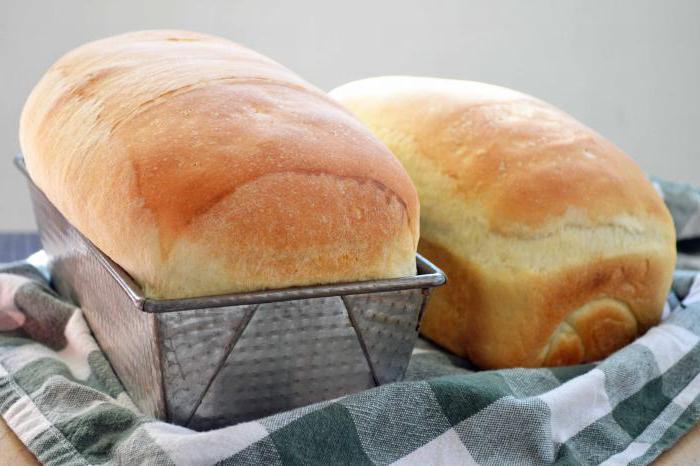
Bake bread at home oven. Quick bread in the oven: recipes and cooking tips
Home-made pastries are highly valued. So, freshly baked bread, exuding a unique aroma, excites appetite by its very appearance. Modern housewives are returning to traditions and prefer to cook homemade bread in the oven with dry yeast.
Benefits of homemade bread
Baking production technology often involves the addition of various preservatives. The store-bought product contains dextrose, soy flour, vegetable fat, vinegar, wheat protein, emulsifiers, and food additives. This allows the manufacturer to improve the appearance and taste of the finished product, to extend its shelf life. It is also not excluded the use of grain of low grades. These factors significantly reduce the useful qualities of purchased bread.
Homemade cakes have an unsurpassed taste. It's inexpensive and useful. Everyone can master the art of making bread. Having gained some skills in working with dough, you can constantly delight your household with the most delicious and healthy bread. You can also experiment with different recipes by adding interesting ingredients.
What do you need to make delicious homemade bread?
Bread was baked in the oven in the old days. Today, many housewives have bread machines and multicookers in which you can quickly cook it. Now we will learn how to cook delicious bread, even without such special devices, using a conventional electric or gas oven.

Every housewife has appliances for baking bread at home. Otherwise, they can always be purchased at any supermarket. In order to bring to life a recipe for delicious bread in the oven, you will need the following kitchen utensils:
- a large bowl in which it will be convenient to knead the dough;
- a wooden spoon or a special spatula for kneading dough;
- baking dish (with thick walls and high sides);
- cling film to cover the dough (you can use a cloth napkin or a small towel).
The main ingredient for cooking the dish is yeast. The result of our efforts depends on their quality. The use of yeast makes the dough fermentation process fast and stable.
Types of dry yeast
Dry yeast (granulated) is of two types:
- Active or steamy. They look like small balls. Yeast must be diluted in water, whey, milk until completely dissolved or a "cap" of foam is obtained.
- Safe. They look like a light brown powder. This product is used for baking quick bread. Yeast is simply mixed with flour and the rest of the ingredients.
Rye bread
There are many recipes for homemade dry yeast bread, which even a beginner can quickly cook. One of the most useful is rye, because it contains a lot of useful substances. In rye flour, compared to wheat flour, there are more valuable trace elements such as potassium, magnesium and iron.

For cooking, you will need the following components:
- dry yeast - 2 teaspoons;
- rye flour - 5 glasses;
- water - 400 ml;
- salt - 2 teaspoons;
- refined sunflower oil.
Recipe step by step
Consider the preparation of food in stages:
- with a sieve.
- Add water, yeast and salt. It turned out dough on dry yeast for bread.
- Knead the dough thoroughly and, covering it with cling film, refrigerate for 15 hours. The dough should increase by about half.
- Remove the dough from the refrigerator and place on a floured table.
- Spread the dough out, overlapping on four sides. You should get a cake of five layers.
- Lightly dust the dough with flour and leave it to prove on the counter, covered with a towel.
- grease with vegetable oil and place it for 5 minutes in an oven preheated to 250 ° C.
- Gently transfer the dough into a floured pan. Put it in the oven.
- Bake 40 minutes. Homemade bread in the oven with dry yeast is ready!
White bread
To make wheat bread with dry yeast in the oven, you will need simple ingredients. It:
- wheat flour - 600 g;
- water - 400 ml;
- dry yeast - 1.5 teaspoons;
- sugar - 1 tablespoon;
- salt - 1 teaspoon;
- vegetable oil - 2 tablespoons.

Recipe step by step
The oven does the following:
- Pour water into a bowl, dissolve yeast and sugar in it. Add salt and sifted flour.
- Mix thoroughly with a spoon. The flour should absorb all the water. Leave the dough for 5 minutes.
- Pour in vegetable oil and continue kneading. When the dough becomes elastic and stops sticking, leave it in a warm place for 4 minutes. Now it should be crushed again. Then let it come up again. Knead the dough again.
- Send the resulting ball into a baking dish. Let him come up one last time.
- When the dough has doubled in size, brush it with egg yolk or milk.
- Send the future bread to bake for 50 minutes in an oven preheated to 180 ° C.
Features of the preparation of dough
Experienced housewives advise taking the preparation of the dough very seriously:
- Water for dough should be taken heated to 35-40 ° C. To withstand the temperature is an important condition. In cold water, yeast bacteria will not multiply, and in too hot water they will die.
- Don't add all the flour at once. First, dissolve dry yeast, salt, sugar and a few tablespoons of flour in water. Stir the mass with a whisk until the lumps completely disappear. The solution should have the consistency of liquid sour cream.
- Add the remaining flour to the water, but not vice versa. This will allow you to adjust it to the amount of liquid and not increase the volume of the finished dough by additionally adding water.
- Opara on dry yeast does not like drafts and loud sounds.
- Its appearance will tell about the readiness of the dough: it should increase significantly in volume and become covered with bubbles.

How to knead the dough?
This question is often asked by newbies. After all, they cook homemade bread in the oven with dry yeast for the first time. Therefore, we will dwell on this stage of preparation in more detail.
- Wash your hands before kneading the dough. Kneading involves working with bare hands. Remove any jewelry from your fingers before touching the dough.
- Gather the dough together. When you first touch it, it will have a rather sticky consistency that will be hard to put together. Work with the mass, pressing down and gradually create a spherical shape. This should be done until the dough becomes homogeneous and stops sticking to your hands. If stickiness remains, then sprinkle the mass with flour, gently mixing it.
- kneading. Lightly push the dough forward with your palms resting on it. "Beat" until it starts to spring. Usually 10 minutes is enough. The kneading process should be rhythmic, not too slow. The dough after such processing will completely get rid of lumps and stickiness. Its surface will become smooth, shiny, the consistency will be elastic.
- Test form. Now you should check if the dough holds its shape. Roll it into a ball and leave it on your desktop. The form of the test after such manipulations should remain unchanged. Poke it with your finger. When the dough is ready, it will return to the shape of a ball.

It depends on the kneading what kind of baking will turn out. With the right actions, the cooked bread will be soft, will acquire a beautiful crispy crust. If the dough was not kneaded thoroughly, the product will end up flat with a hard, dense texture.
cooking secrets
To prepare delicious bread, you should use useful tips.
- Before kneading the dough, sift the flour through a sieve. This will fill it with oxygen and give the dough a porous structure. Baking will be fluffy and light.
- In order not to get lumps in the dough, all ingredients should be added to the flour.
- At the initial stage, the dough must be kneaded in a bowl with a spoon. When it begins to separate from the container, kneading should be done by hand. Put the mass on the table, previously sprinkled with flour.
- To make the dough “fit”, that is, increase in volume, cover it with a towel and put it in a warm place. You can significantly speed up this process if you stick a few straws into the future bread.
- Do not leave the dough in a draft.
- The dough will increase in volume several times if you remove the air bubbles by kneading your hands a little.
- After the dough is laid out in a baking dish, you should put it in a warm place for 20 minutes. The product will become even more magnificent.
- It is necessary to place future bread in the oven, preheated to the required temperature.
- A regular toothpick will help determine the readiness. If it remains clean after piercing the product, then it is ready.
No one can resist the fluffy, tender crumb of bread with a thin golden crust. It is impossible to overestimate the taste and aroma of baking. Homemade bread with dry yeast in the oven cooks quickly, and the result exceeds all expectations.
How many people live in the world, so much they bake bread. And it is simply impossible to imagine our table without this product. Probably, there is nothing tastier than fragrant fresh bread. And in a house where it smells of fresh bread, you always want to return so much. That is why home-baking of bread is becoming more and more popular today, and housewives are so eager to master this art.
Of course, today bread is practically no longer baked in ovens, as it used to be. The easiest way for a modern person is to bake bread in a bread machine, the very name of this unit speaks of its purpose. But, even those who do not have a bread machine can easily bake bread in an ordinary oven, because today there are many recipes for homemade bread: white, rye, yeast dough, yeast-free, and everyone can choose a recipe for themselves to your liking.
Bread in the oven - food preparation
Of course, the quality of the flour is of the utmost importance for making good bread. Flour should be taken dry, without lumps, fresh. In order to get an idea of the suitability of flour, you need to take a pinch and moisten it with water or saliva. If the color of the flour remains light, then it is fresh; if the flour has darkened, then it is stale. If it seems to you that the flour is damp, then it should be dried.
A prerequisite for successful bread baking is flour sifting. This will allow it to be saturated with oxygen and eventually turn into soft and fluffy bread, fragrant and unusually tasty, which is how a homemade loaf should be.
Bread in the oven - the best recipes
Recipe 1: Rye Oven Bread

This is a fairly simple recipe for rye bread, which even a novice hostess can master. Its disadvantage, perhaps, lies in the duration of preparation. However, using this recipe, you will prepare traditional homemade bread, fragrant and tasty, which will not go stale for a long time.
Ingredients:
800 gr. rye flour;
400 gr. water;
10 gr. yeast (dry);
2 tsp salt;
grows. oil.
Cooking method:
1. After sifting the flour, add water with yeast and salt to it. We knead the dough, however, not to a homogeneous mass, but so that there is enough air left in it to make the pastries porous. Then, covering the bowl with the dough with a film, put it in the refrigerator for 16 hours.
2. After the specified time has elapsed, we take the dough out of the refrigerator and, having sprinkled the table with flour, put it there. We leave the dough for a few minutes so that it itself “stretches” over the surface of the table. After we knead it lightly, put it on a clean towel and leave it to “rest” for another 3 hours, covering it with the free ends of the towel.
3. To bake bread, heat the oven to 250°C. We grease the form or pan in which we will bake the bread with vegetable oil, and put it in the oven for 5 minutes to warm up. Then, taking the pan out of the oven, carefully transfer the dough there and cover it with a lid. We bake the bread for about 40 minutes, then remove the lid and continue baking for about 15 minutes until cooked.
Recipe 2: Oven wheat bread

According to this recipe, you will get a wonderful bread, with a crispy crust and a fluffy crumb.
Ingredients:
1.5 kg of wheat flour;
25 g fresh yeast;
50 gr. rast. oils;
1 st. l. salt and sugar.
Cooking method:
1. Stir the yeast in 1 liter. warm water, then pour the resulting dough into a saucepan and add flour with vegetable oil, sugar and salt to it (leave a glass of flour). We knead the dough. Having formed a ball out of it, knead for about 10 minutes. Then we grease the pan with vegetable oil, transfer the dough into it and, having covered it with a lid, leave it to rise.
2. After increasing the dough in volume, we crush it and knead it for several minutes.
3. We prepare forms for baking bread by lubricating them with vegetable oil. We shift the dough into them. You can put the dough on a baking sheet, giving it a round shape, then we will get one large round loaf. Cover the dough with clingfilm and leave to rise in a warm place for about an hour. Then, preheating the oven to 200 ° C, bake the bread for about half an hour. Cool the finished loaves on a wire rack.
Recipe 3: Kefir Oven Bread

This bread is a real find for those who do not like yeast dough. Although the recipe is very simple, the bread turns out to be very tasty, fragrant, it retains a fresh look and taste for a long time.
Ingredients:
600 ml of kefir;
6 glasses of flour;
1 tsp sugar, salt, and soda;
2 tsp cumin.
Cooking method:
1. Mixing kefir with flour, salt, sugar, soda, salt and cumin in a bowl, knead the dough (you can first mix with a spoon). Having received a thick but soft dough, on a baking sheet greased with vegetable oil, we form a loaf out of it. For better baking of the dough, we make cuts on top, and to form a crispy crust, sprinkle flour on top.
2. Having warmed up the oven well, we place our baking sheet with the dough there. We bake for about 40 minutes.
If you are making bread using the sourdough method, do not allow the sourdough to cool. This can cause the bread to be too thick and difficult to digest.
The readiness of the dough is not at all difficult to determine. This will become clear when it doubles in volume and becomes covered with bubbles. You can talk about the readiness of the test when it stops sticking to your hands. The color of the crust and the sound that we hear when we tap on the bottom crust of the loaf will tell about the readiness of the bread - if it is distinct, then the bread is ready. Also, the readiness of bread can be checked by sticking a wooden toothpick into it. If it comes out dry and clean, then our bread is ready; if traces of dough are visible on it, then the bread still needs to be baked.
If you do not want to get a sticky crumb, rubbery crust and other defects, freshly baked bread must be taken out of the oven very carefully. The cooling of hot bread should be slow and natural. In this case, it is necessary to provide air access to the bottom of the loaf, that is, a sieve, grate, etc. can be a suitable place for this.
10 recipes for making bread at homeThe most delicious bread is, of course, the one you baked with your own hands.
Bread on the table is a constant symbol of well-being and prosperity. Bread is a symbol of labor, home, family happiness. No one will doubt that one of the most amazing smells on earth is the smell of freshly baked bread. How tasty it is to eat a crispy crust!Bread has always been valued and considered holy. People were anxious about grain, the harvest of a rich harvest was a holiday. Since ancient times in Russia they have been baking bread, monasteries have always been especially famous for this.
Recently, the tradition of home baking is returning. And even if it takes a lot of patience, attention, reverent attitude to the product, it's worth it. Homemade bread is the best!
1. Homemade Russian bread
Compound:
. water - 350 ml
. dry yeast - 1 teaspoon, or fresh yeast - 25 g
. sugar - 1 teaspoon
. flour - about 0.5 kg
. salt - 1 teaspoon
. cumin - to taste
. vegetable oil - 2-3 tablespoons
Cooking method:
1.
Pour yeast, sugar and a teaspoon of flour into a half-liter mug, mix everything dry, and then mix by adding a little water. Then pour out the rest of the water and mix again. Water should be very warm, boiled. Place the mug in a warm place. The resulting yeast wiring is ready when a head of foam appears on it. This takes about half an hour.
2.
Pour the yeast wiring into a two-liter bowl, add 1 cup of flour there and mix thoroughly. Place the resulting mixture in a warm place for about 1 hour, until the mixture rises, turning into foam. This is how steam is made.
3.
Add vegetable oil, salt, cumin to the dough, mix everything thoroughly and knead the dough, gradually adding flour (first a glass, at the end half a glass or less). While the mixture is liquid, knead with a spoon, when it thickens, knead with your hands right in the bowl. When the dough stops sticking to your hands and dishes, it means that you do not need to add more flour. It is important to catch this moment and not shift the flour. Form the finished dough into a bun, transfer to another larger bowl (with a capacity of 4 liters). Sprinkle the bowl with flour first to make the dough less sticky, and put in a warm place.
4.
When the dough has risen after an hour or two, filling almost the entire bowl, knead it and let it rise again. At the same time, you can add a little flour if the dough began to stick to your hands. After the second rise, it must be kneaded again, and the bun of dough should be placed on a baking sheet.
5.
Lubricate the baking sheet with vegetable oil, then the baking dough and place in a warm place for about an hour or less. Here it is no longer necessary to wait for a very large rise in the dough, so that large gas bubbles do not form in the bread. For the same purpose, before planting the dough in the oven, pierce the dough with a large needle from above and almost to the bottom, making at least 20 punctures.
6.
Put the baking sheet with the dough in the oven preheated to 200 degrees Celsius. At the same temperature, bake bread for about 40 minutes, you can take longer, but no more than 1 hour. The readiness of bread is judged by the color of the top crust. It should be uniform brown.
7.
After the bread is ready, take it out, wrap it in a towel, cover with plastic wrap and soak for 30 minutes. As a result of this, the bread crust will soften and will not be tough.
2. Rye bread
Compound:
. salt - 1 tablespoon
. vegetable oil - 1 tablespoon
. cumin seeds - 3 tablespoons
. wheat flour - 3 cups
. rye flour - 3 cups
. sugar - 1 tablespoon
. yeast - 2 tablespoons
. water - 3 glasses
Cooking method:
1.
For the dough, mix warm water, yeast, sugar and leave until frothy. Mix rye flour, wheat flour, cumin seeds and salt. Pour the dough into the flour and knead until a soft dough forms. Cover with a towel and set aside for about 1 hour in a warm place. After the dough has risen, divide it in half, place on a greased baking sheet and leave for 2 hours.
2.
Preheat the oven to high temperature and place a baking sheet in it. Bake for about 1 hour until browned. Lubricate the surface with a brush with milk or butter. Refrigerate 15 minutes before removing from bread pans. Add beauty and flavor to bread with a sprinkle. It can be added at different stages of bread baking: at the beginning of baking, 10 minutes after the start of baking, or immediately after the end of baking, while the bread is still hot. If you want to sprinkle bread at the start of baking, simply open the lid quickly to lose as little heat as possible. Before adding the topping, the bread must be smeared with glaze. Then the topping will really linger on the bread.
3. Bread with flax and caraway seeds
Compound:
. pure wheat flour - 500 g
. mineral water with gas - 200 ml
. milk - 250 ml
. salt - 2 teaspoons
. honey - 1 tablespoon
. tahini paste - 3 tablespoons
. ground flax seeds - 5 tablespoons
. yeast - 10 g
. ground cumin seeds - 1 teaspoon
Cooking method:
1.
Dissolve the yeast in a small amount of warm milk with honey and let stand for about 10 minutes. Mix ingredients except oil, cumin and salt. Sifting the flour in parts, knead the dough, adding oil and salt at the end. Knead thoroughly for 15 minutes, the dough is very sticky to your hands. Don't add flour. Lubricate your hands with vegetable oil. Roll the dough into a ball, place in a greased bowl and leave to rise in a warm place until doubled in size. Punch down the risen dough and form the bread.
2.
Put in a mold, sprinkle with ground cumin, cover and set to approach. Heat the oven to maximum temperature. Place the bread in the oven and bake for 5 minutes at a high temperature, spraying the oven with water a couple of times during baking, then reduce the temperature to 225 degrees Celsius and bake until the crust is dark. Cool the finished bread on a wire rack.
 4. Long loaf for tea
Compound:
. wheat flour - 750 g
. salt - 3 teaspoons
. yeast - 30 g
. milk - 400 ml
. butter (or margarine) - 50 g
. egg - 1 pc.
Cooking method:
1.
Put the flour in a deep bowl, add warm milk, softened butter, salt and knead the dough.
2.
Once the dough stops sticking to your hands and starts bubbling, shape into a ball and place in a bowl. Put a plastic bag over the bowl, cover with a towel and put in a warm place until the dough doubles in size. Knead again, put in a mold for about 30 minutes until it rises again, brush the surface with egg and make a few shallow cuts with a knife. Bake for 10 minutes at 250 degrees Celsius and 35 minutes at 200 degrees Celsius. Place a bowl of water in the bottom of the oven.
5. Nut bread
Compound:
. flour - 1 kg
. dry yeast - 16 g
. salt - 20 g
. sugar - 30 g
. sunflower (or olive) oil - 70 ml
. shelled walnuts - 2 handfuls
. black beer - 1 bottle
Cooking method:
1.
Stir all the products with a mixer, first all the dry ingredients, gradually adding oil and beer. The dough should not be hard or liquid. It will be a little sticky.
2.
Make loaves of bread. Approximately the size of two palms. Then put the dough for at least half an hour in a warm place, it will fit a little, but the dough is heavy due to the nuts. Bake in the oven at 180 degrees for 50 minutes.
Bread made in a bread machine:
6. Borodino bread
Borodino bread is unique in taste and aroma. Dark as sadness, he is a witness to the immortality of the Russian spirit during the Battle of Borodino. This is the memory of the Grand Russian Duchess Margarita Mikhailovna Tuchkova and her love for her husband. This bread of patience, suffering, the sweetness of hope. Let's learn how to bake this truly Russian bread.
Compound:
. dry yeast - 2 teaspoons
. wheat flour - 1 cup
. rye flour - 2 and 3/4 cups
. rye malt - 4 tablespoons
. ground coriander - 1 tablespoon
. salt - 1 teaspoon
. vegetable oil - 2 tablespoons
. honey - 2 tablespoons
. water - 430 ml (including 80 ml for brewing rye malt)
. sourdough Extra-R
Cooking method:
In a separate cup, pour 80 ml of boiling water over 4 tablespoons of rye malt, mix and leave to cool. Put the yeast, flour, Extra-R sourdough, salt, butter, honey, coriander into the bucket of the bread machine. Add the cooled, brewed malt and top up with the rest of the water (350 ml). Turn on the bread maker in the "Rye bread" mode.
7. Banana Strawberry Bread
Compound:
. milk - 1/3 cup
. ripe banana (mashed) - 1/3 cup
. strawberry jam - 1/4 cup
. egg - 1 pc.
. butter (softened) - 2 tablespoons
. water - 2 tablespoons
. salt - 3/4 teaspoon
. bread flour - 3 cups
. yeast - 1 teaspoon
Cooking method:
Add the ingredients to the bread machine in the order listed. Set to basic white bread. Bake the dough until crispy.
8. Butter bread in Arkhangelsk
Compound:
. liquid (water, milk, dairy products or their mixture) + eggs (2 pcs.) = 160 ml
. oil - 4 tablespoons
. flour - 2 cups
. sugar - 3 tablespoons
. vanilla sugar - 1 teaspoon or cinnamon - 1/4 teaspoon
. salt - 1/2 teaspoon
. yeast - 1.5 teaspoons
. raisins - 0.5 cups
. nuts - 0.3 cups
Cooking method:
Add the ingredients to the bread machine in the order listed. Add the last two ingredients at the beep so that they do not break during kneading. It is better not to soak the raisins - otherwise they break badly in the bread machine. In recipes with a lot of sugar, it is best to use the light crust setting.
9. Egg bread
Compound:
. eggs - 2 pcs.
. water - 1 cup
. wheat flour - 3 cups
. salt - 1.5 teaspoons
. sugar - 2 tablespoons
. skimmed milk powder - 3 tablespoons
. butter - 2 tablespoons
. yeast - 2.25 teaspoons
Cooking method:
Measure the ingredients and place in the bread maker (mould). Set the bread baking regulator and press the "Start" button. Preparing 2 hours.
10. Bread with raisins and cinnamon
Compound:
water - 0.75 cups
wheat flour - 2 cups
salt - 0.75 teaspoon
brown sugar - 2 tablespoons
skimmed milk powder - 1 tablespoon
butter - 1 tablespoon
cinnamon - 1 teaspoon
yeast - 1.25 teaspoons
walnuts - 0.25 cups
raisins - 0.25 cups
Cooking method:
Add the ingredients to the bread machine in the order listed. Set the bread baking regulator, press the "Start" button. After the signal, add the chopped nuts and raisins.
Bread has always been the breadwinner. In prayer we ask God: "Give us our daily bread today...". Bread is life, what they swore for, what they died for, what they promised, and those who broke and shared bread were friends. Guests were greeted with bread and salt and blessed for exploits.
Many people are increasingly starting to prepare food at home, which everyone is usually used to buying in a store. There are several reasons for this: it tastes better, is more nutritious, reduces the consumption of harmful dyes and preservatives, and is often cheaper than in the supermarket.
Baking is a prime example of this phenomenon. Homemade bread is much tastier than store bought. And doing it is not as expensive and time consuming as it might seem to many.
All the horrors are the cons of store-bought bread
We make daily purchases in stores and believe that the bread that we see on the shelves should look like this. In fact, those baked goods that we buy in the supermarket have a fresh and pleasant appearance only because they are produced on an industrial scale, and if they do not have it, we simply will not buy them.
The main goal of manufacturers is to produce from each loaf without increasing the cost of its preparation. Therefore, a large amount of yeast is added to the dough, due to which the texture of the bread becomes “light”, saturated with air bubbles. This technology also allows the use of flour from low-grade grain, due to which the nutritional properties of the bread are also reduced.
Another problem with store-bought bread is the use of preservatives. By extending the shelf life of bread, the manufacturer reduces his costs. With every slice of bread we buy at the supermarket, we eat a healthy dose of preservatives.
Many ingredients are simply not indicated on the labels by unscrupulous manufacturers.
Cooking your delicious homemade bread, easy and cheap


Easy homemade bread recipe
2016-05-11 10:07:36
It seems to everyone that making a loaf of bread at home is extremely difficult and time-consuming, and without special devices such as a bread machine, it is completely impossible. In fact, bread is quite easy to make at home.
You will need
- one large mixing bowl
- one spoon for mixing dough
- one measuring cup
- one teaspoon
- one baking dish (preferably rectangular)
- one hand towel to cover the dough
Ingredients
- milk 1/4 cup
- sugar 5 tsp
- salt 1 tsp
- butter 5 tsp
- dry yeast 1 sachet
- flour 2 1/2 - 3 1/2 cups
- vegetable oil for greasing the mold
Add products to the list
If you don't have the "Buy a loaf!" app yet, you will see a list of ingredients immediately after installing it
Cooking method
- First, you need to heat the bowl to mix the ingredients. Simply fill it with hot water for a while. Then drain the water and dilute the yeast according to the instructions on the package. As a rule, you need to stir the yeast in a glass of warm water. The result should be a yellow-brown liquid mixture with bubbles. You need to mix it well so that there are no lumps.
- Melt the butter in the microwave, add it to the yeast. Add milk, sugar and salt to the bowl. We mix everything well. After that, add two cups of flour to the mixture (note that we do not add all the flour, only 2 cups).
- Mix everything well again. Then add about 1/4 cup more flour and knead the dough again. Continue adding flour little by little until the dough begins to lag behind the sides of the bowl.
- Now we start kneading the dough. To do this, you need to take a little flour in the palm of your hand and sprinkle it on the work surface. Take the dough out of the bowl and start kneading it. We knead the dough for about ten minutes: a little wrinkled, twisted, rolled into a ball, wrinkled again and so on several times.
- After 10 minutes have passed, we form a ball from the dough (see photo) and put it in a bowl. Top with a towel and put in a warm place (for example, on the stove) for 1 hour.
- During this time, the dough should rise to about double. Then we spread it on a floured surface and roll it out, giving it a rectangular shape (about the same width as a baking dish).
- Finally, roll up the dough into a roll. The resulting "roll" should be about the same size as the baking dish.
- Place the loaf seam side down in a greased baking dish. Cover again with a towel and leave in a warm place for another 1 hour. The loaf should rise a little more.
- After an hour, we send the bread to the oven, heated to 200 ° C, for 30 minutes. After half an hour, we take the loaf out of the oven and immediately take it out of the mold so that the bread cools.
- It is important to let the bread cool completely before cutting it!
Notes
- To mix the ingredients, you can use a blender or mixer. They make the process easier and faster. However, if there are none at hand, you can knead and mix the ingredients by hand.
Ode to bread can be sung endlessly. Bread is the head of everything, there will be bread - there will be lunch ... Today, buying bread is not a problem, but technology in this case has rather gone to the detriment, since now you can find an almost complete periodic table in a loaf, which allows baking not stale for weeks. Have you ever bought American bread for toast? Check it out, you will be pleasantly surprised.
Whether it's homemade cakes, the components of which you are more than sure of. Baking bread at home is very easy. Do not be afraid to work with the dough, treat it with confidence, and in return it will give you a warm and fragrant crumb.
History of creation
It is possible to consider the history of the development of bread endlessly - it has been constant as the basis of the human diet from century to century, while the recipe and cooking method have been steadily changing. According to scientists, it began about 15 thousand years ago, when our ancestors began to grind grains with stones, after which they mixed them with water. Thus, the first bread was in the form of a semi-liquid stew. Over time, having curbed the fire and learned to keep it in the hearth, people began to bake unleavened cakes. Thanks to this, they made their diet more stable, having the opportunity to stock up on food from grain.
The first bread in its more or less familiar form appeared thanks to the ancient Egyptians. According to the assumption, about 6 thousand years ago, due to a mistake (very successful, we have to admit), people found out that the fermentation process is able to loosen the dough, probably they simply left it in a warm place overnight, and in the morning they found that the mass became softer. Such a fast fermentation process is associated with a high ambient temperature and unrefined grain. Thanks to this discovery, the inhabitants of ancient Egypt figured out how to bake soft and fluffy bread at home instead of a hard cake.
The familiar name "bread" supposedly appeared thanks to the bakers of Ancient Greece, who baked cakes in special vessels - klibanos. From there, it spread further throughout the world, undergoing changes, depending on the locality.
Role in society
The very technology of baking bread has also improved over time, taking an increasing part of people's nutrition. Bread was an indicator of status in Europe. For example, it was not enough to know how to bake homemade bread - the hostess had to strictly observe the serving of dishes at the official table.

Bread varied from the highest quality - white from sifted flour, which was offered to the most titled guests at the head of the table, to plain black, which was placed at the end of the table for the simplest eaters. Stale loaves were also used - they were hollowed out, imitating plates, and food was served in them.
Role in Russian culture
In Russia, it is extremely difficult to overestimate bread as a symbol. It is justifiably considered a synonym for well-being in all its manifestations. That is why all joyful events, whether it be the arrival of dear guests or a wedding, were met with a loaf and salt. Bread is like a full house, a house is like a talisman from troubles.
Our days
Now there are no problems with how to bake bread at home. The classic recipe includes a fermentation catalyst (sourdough or yeast), flour, water and salt. From here, recipes are increasingly diverging that will help you revive the heritage of both Russia and other states in the conditions of home cooking.

Judge for yourself, at least you have access to:
- Russian loaf;
- Caucasian lavash;
- Italian ciabatta;
- french baguette;
- german pretzels.
But each of these names has several varieties! You will be able to please your loved ones with something new every day.
Basic Recipe
In order to bake bread at home in the oven, just take:

- wheat flour of the highest grade - 1 kg;
- warm water - 625 ml;
- fresh yeast - 30 grams (if your yeast is dry, then take it half as much);
- coarse salt - 2 tbsp. spoons;
- sugar - 2 tbsp. spoons;
- flour for kneading - as needed.
Sequencing
It should be noted that you can both bake bread in a bread machine and manually - in the first case, you will even make your task easier. It will be enough to correctly set up all the stages of mixing and place the necessary components in the equipment. Plus, in busy conditions, it is even more convenient, since the device will do everything for you - there is no need to be constantly at the oven.
Sift the flour with a slide on a clean surface, make a depression and pour half the water into it, add the rest of the ingredients there, except for the flour for kneading. Slowly gather the flour along the edge with your hand, kneading the dough to a semi-liquid, viscous mass. Add the rest of the flour and keep mixing until you've used up all the flour in the "slide". At this point, the dough will no longer stick to your hands, it will be soft, but elastic. Work with it as actively as possible - knead, fold until it becomes elastic. Place the dough in a large bowl, cover with cling film and place in a warm place.
Once the dough has doubled in size, knead it vigorously for at least half a minute. At this stage, you can add various products and seasonings in order to give it personality. We will consider options for such combinations, which will show how to bake bread at home with a unique taste, after the main recipe. It should be noted that you can both bake bread in a bread machine and manually - in the first case, you will even make your task easier. It will be enough to correctly set up all the stages of mixing and place the necessary components in the equipment. Plus, in busy conditions, it is even more convenient, since the device will do everything for you - there is no need to be constantly at the oven.
Put the prepared dough in a baking dish, return to a warm place, previously covered. It should again double in size. This will take approximately an hour.
Heat the oven to 200 C. Place the risen bread in it and bake for half an hour. The cooking time may vary depending on the thickness of the dough layer. In order to determine the readiness of baking, it is enough to knock on the bread bottom - if the sound is deaf, then everything is ready.
Wrap the finished bread in a kitchen towel and let it rest for 20 minutes.
Taste variations
Below we highlight successful combinations of additives, thanks to which you will learn how to bake homemade bread with a taste that is not available in store samples:

All of these variations are not limited to the oven - if necessary, you can either bake bread in a slow cooker or in your grandmother's wood-burning stove.
Alternative to yeast
More and more people are trying to move away from yeast in favor of sourdough, arguing that the latter is older and healthier. The dispute between these two baking powder is still open.

Making sourdough at home is quite simple, just get rye flour and patience. Sequencing:
- Mix in a spacious container 100 grams of rye flour and 150 grams of warm water. Cover with a towel and leave overnight in a warm place.
- The next day, add another 100 grams of flour with water, mix, return to the place.
- After another day, add 150 and 100 grams of water with flour, respectively, return the container to its place.
- A day later, repeat the procedure with 100 grams of flour and water, return to its place.
- On the fifth day, the natural baking powder is ready. The starter is airy, saturated with bubbles, has a slightly sour bready smell. You can bake!